Table of Contents
Barix Barionet

Barionet devices from Barix are excellent digital IO devices. In addition to relay outputs and digital input/output they also support 1-wire temperature sensors and a network enabled RS232 serial port that any other supported serial device, such as a W800 or CM11a can be hung off of. XTension supports both the Barix 50, the Barix 100, and the addition of an X8 expander module if you need more inputs and outputs.
As of XTension version 9.4.14 the original Barix plugin has been replaced. To ease the conversion of existing databases the original plugin is still included in the application. When creating a new Barix interface please use the “Barix/Barionet New Plugin” and not the original “barix” plugin. See below for instructions on converting an existing barix connection to the new plugin.
Barix Setup
After performing the initial setup of the Barix unit as per their instructions and getting it on your network there are a few other settings necessary so that XTension can connect to it. Visit the Barix in a web browser and click the “Configuration” link towards the top.
Static Ip
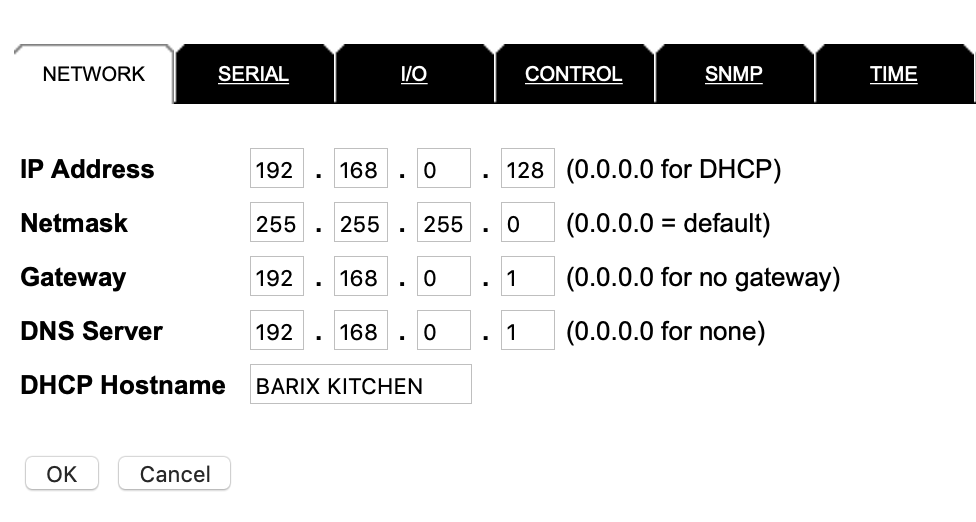 In order for XTension to find the Barix unit it must be assigned a static IP address on your network. There are 2 ways to do this depending on your preferences and the capabilities of your internet router/modem. Most routers will allow you to setup a “DHCP Reservation” which just means that whenever that device asks for an address it will always be given the same one. This is the simplest way to set a static IP, but is reliant on the router remembering it’s settings and you’d have to reset all your reservations if the router ever needed to be reloaded or replaced. The second way is to assign manually an address outside of the DHCP range setup on your router. For example on my router I have IP addresses from x.x.x.100 to x.x.x.254 setup as the DHCP range. It will give addresses in that range out to any device requesting an IP address. That leaves addresses from x.x.x.2 (.1 is almost always the router unless it’s setup to be .254 which is starting to become more common, it will be one or the other) and x.x.x.99 as open for me to manually assign to any devices on my network that require a static IP. Once you’ve chosen an address for the Barix make sure that the rest of the information on the “Network” tab of the interface is correct for your network.
Command and Control Settings
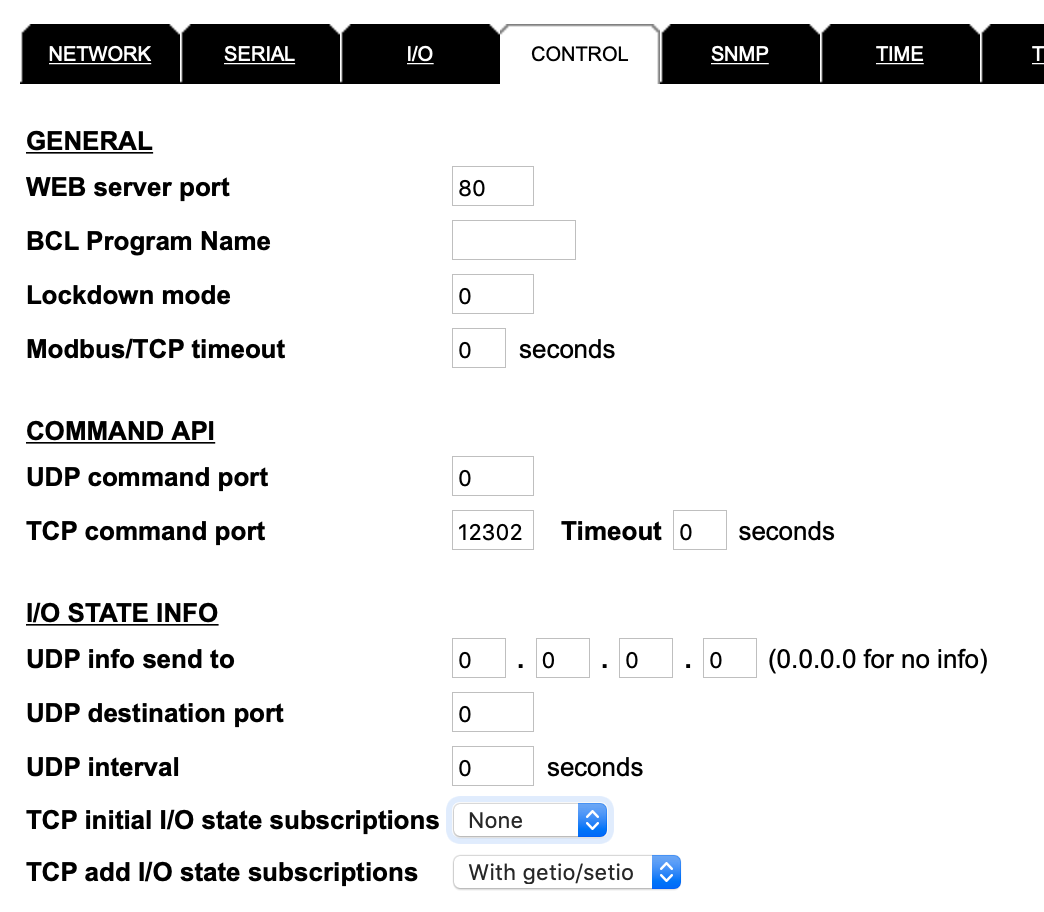 Switch to the “Control” tab and find the “Command API” section. The TCP command port needs to be a non-zero value to enable the incoming control connection from XTension. The default port for this connection is 12302 but any valid port will work fine other than 80 as long as it’s the same in the setup in XTension. The Timeout value after the port should be 0 for no timeout.
The next section is “I/O State Info” the last entry here “TCP add I/O state subscriptions” needs to be set to “with getio/setio”
XTension does not use the UDP connection method and so no settings there are needed. If you had some other system that needed to connect to the Barix in that way it should work fine to have both that and XTension active at the same time. Otherwise keep the UDP info send to set to all 0’s as in the example image.
Click the “OK” button to save and reboot the device with the new settings. If you changed the IP address you’ll need to reconnect on the new IP if you wish to continue using the web interface.
XTension Setup
Open the Interfaces window in XTension and click the “New Interface” toolbar button. Select “Barix/Barionet New Plugin” from the device type popup and the rest of the Barix specific interface will be shown.
Networking Settings
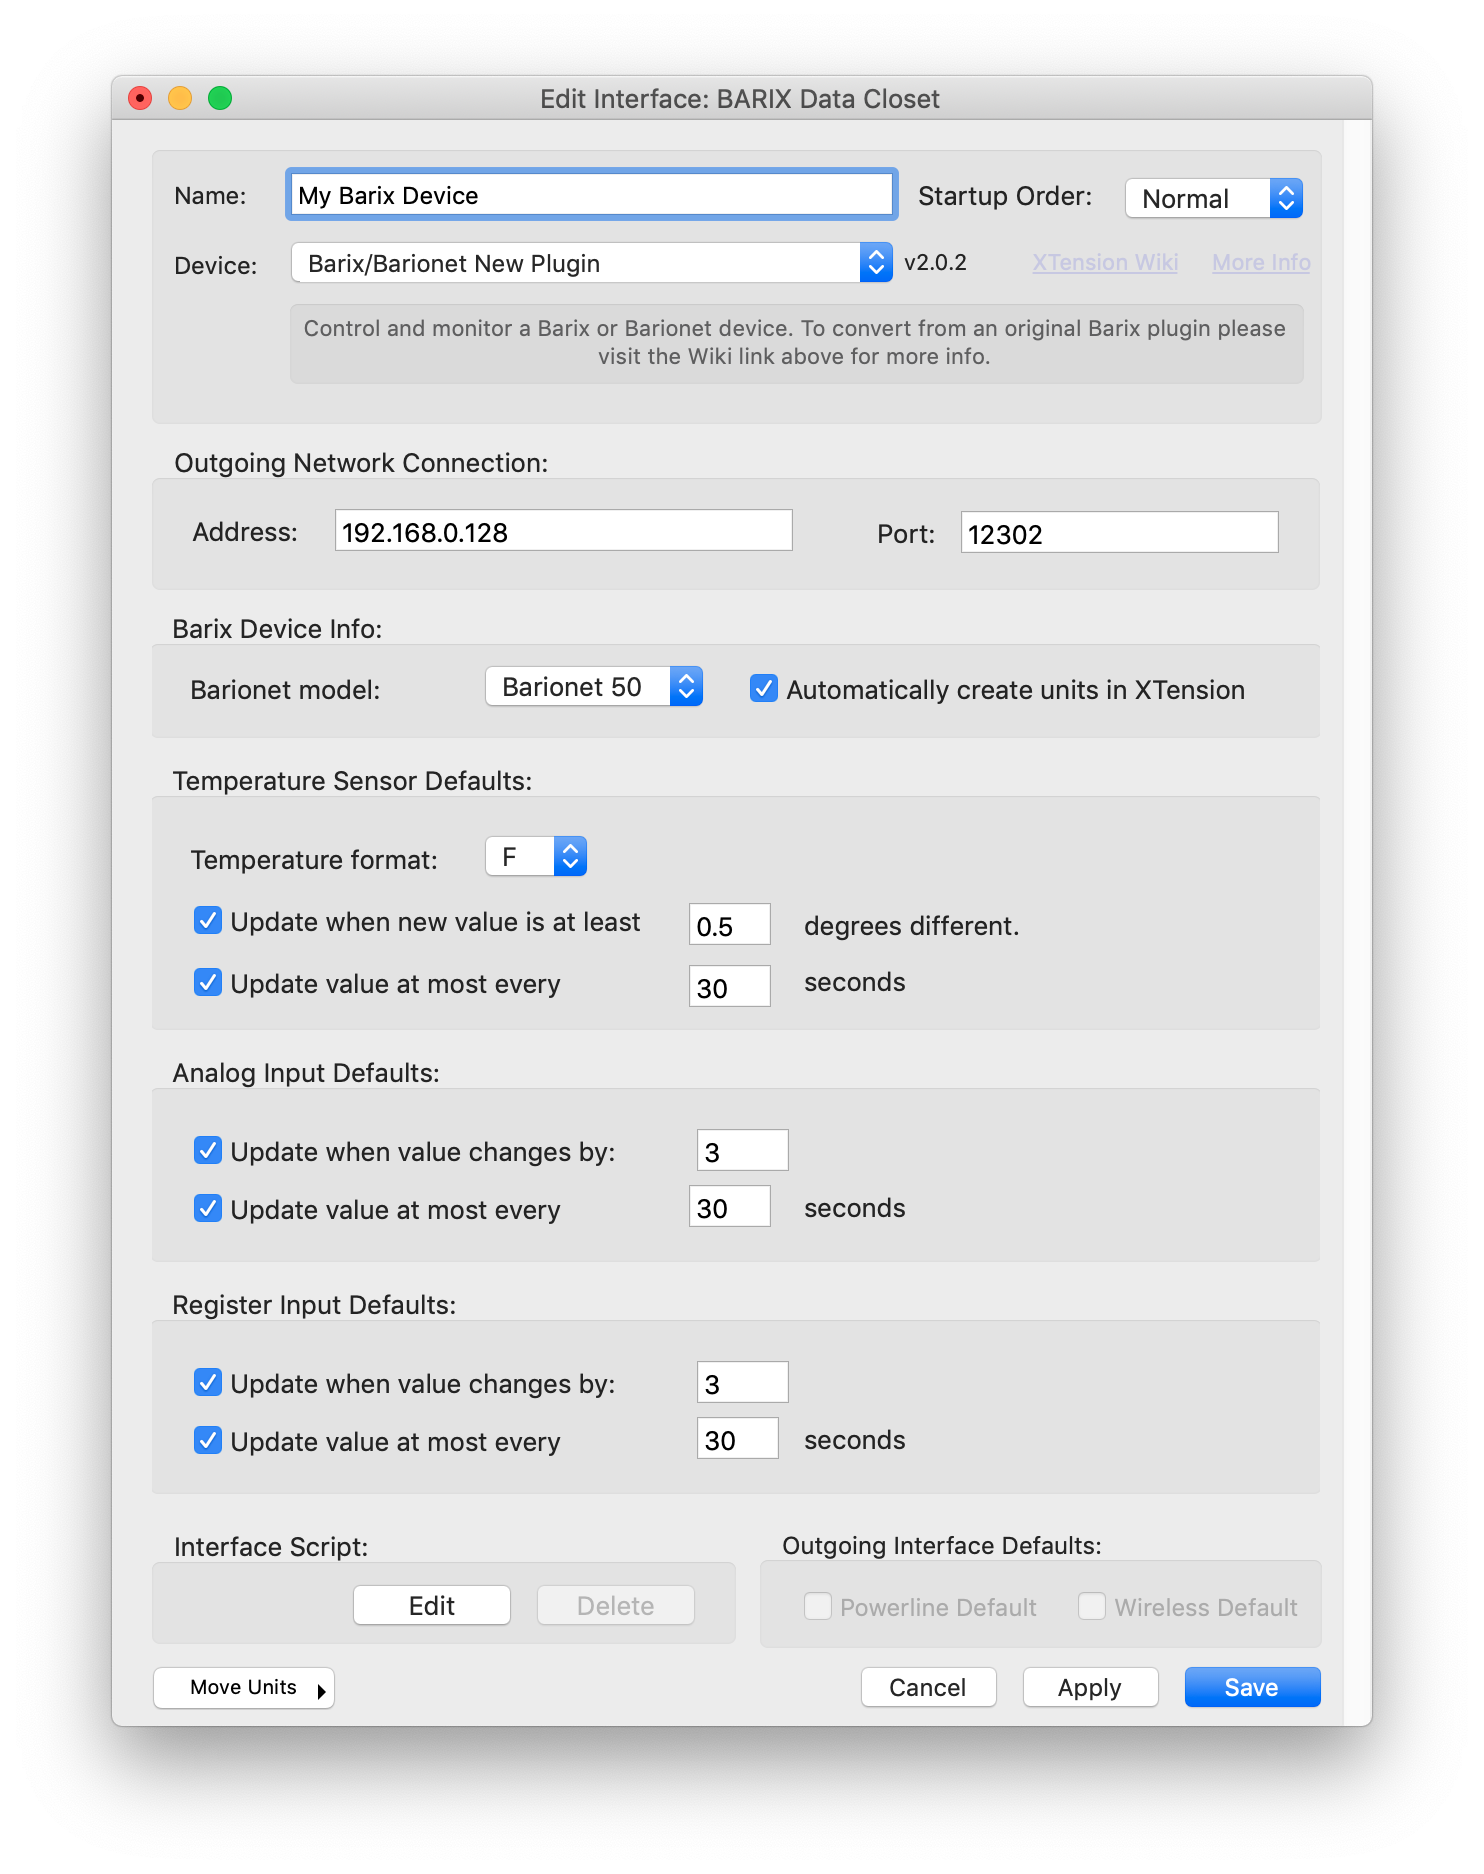
Enter the IP address and Port that you setup in the Barix configuration above.
Device Info
Select the model of your Barix from the Barionet Model popup menu. By default the “Automatically create units in XTension” checkbox is turned on. As soon as you connect to your barix for the first time units will automatically be created for whatever IO is supports as well as any 1-wire temperature sensors that are found. If you have an X8 expander module those units cannot be created automatically, you should create those and assign them the proper register address.
Temperature Format
Select F or C to choose the temperature scale used when presenting the 1-wire sensor values.
Analog, Register and Temperature Sensor defaults
These settings here apply to newly created or converted units but will not change the values setup in the individual unit’s settings. For each of the 4 device types that support filtering the Edit Unit dialog will have an identical set of controls so you can change them individually after this initial default is applied when they are created. See the section below on Filtering for a description of the logic used.
Filtering
 There are 4 unit types that support filtering. 1-wire temperature sensors, analog inputs, register values, and Expander Temperature. The Expander Temperature unit type should be used when you have 1-wire sensors attached to an X8 expander module.
These analog and sensor inputs can be very chatty. It’s not always necessary to know that the 1-wire sensor has changed by a tenth of a degree. Such inputs may change continually every few seconds or more generating an unnecessary load on your system not to mention filling up your logs with unnecessary precision. XTension can filter these inputs by either time, significant change or both.
The time filter will not allow an update to happen until at least as much time has passed as you enter. If the pending value from the barix is the same as the current value in the database when the interval runs out then no update is sent, the next time an update is sent after that it will be passed immediately through to XTension.
Significant change will not send an update until the new value is different from the current value by the amount that you have entered.
If you turn both filters on then you can have much slower regular updates, but still catch a rapid change in values. For example by setting the time filter to 5 minutes and the significant change to 0.5 you will remove most of the small fluctuations in the readings but still get updates if the temperature starts changing quickly.
Expansion Modules
Expander modules such as the X8, can increase the number of inputs and outputs available. They will be assigned different register numbers in the Barix depending on their function and how many of them there are. These units cannot be discovered automatically so you will have to create the corresponding units in XTension manually.
Temp sensors attached to expansion modules need to have their device type set to “Expansion Temperature” and not just the “Temperature” device type that is used for ones attached to the barix directly. Enter their register address into the address field of the new unit and they will pick up on the proper temperature conversion to F or C and have the same filtering interface as devices attached to the parent barix device.
Temperature Sensors
1-wire temperature sensors attached to the barix are assigned registers starting at 601 and going to 655. As long as the sensor chain never changes they will keep the same register number. If you add or remove a sensor however the entire bus can re-arrange itself moving your sensors to other registers and you’d have to go through and figure out which each one was again. To avoid this problem XTension does not use the register number as it does for all other inputs and outputs but instead uses the hardware ID of the temperature sensor itself. Addresses for temperature sensors created by XTension will be 8 Hex characters representing 4 bytes of data. The upper 4 bytes of the unique address are ignored. The temperature sensors address will be in the form of “E4BB0C10.” Since the unique ID of the sensors never change your units will always stay linked to the same sensor no matter how many you add or remove from the chain. Since the Barix only enumerates the 1-wire bus at power on it can’t change while it’s connected. Every time the connection is dropped and re-stablished to the Barix the index that relates the hardware addresses to the actual register addresses is rebuilt. To safely add or remove sensors from the bus just power off the barix, make your wiring changes and power the barix back on. The XTension interface will go into an error mode when the connection is dropped and then continue to retry until the Barix returns to the network. When it reconnects the previous indexes will be cleared, the hardware addresses are re-read and re-indexed with the real register addresses and if new temperature sensors are found then those units will be created automatically in XTension.
This basically makes it something that you no longer have to worry about.
If you have an existing barix interface with 1-wire sensors and are using the “native addressing” option then you don’t need to do anything extra when converting. If you have your temperature sensors currently using the real register address as the unit address (601-650) then you will need to swap the addresses between the unit that XTension creates and your original one. For more info see the converting section below.
If you have temperature sensors connected to an X8 expander you will have to create or convert the type of those devices manually.
Converting from the Original Barix Plugin
If you are using the original Barix plugin then it is necessary to convert your units to the new unit types so that they can be used with the new interface.
- Disable your existing Barix interface.
- Edit the interface and change the device popup from “Barix” to “Barix/Barionet New Plugin”
- Adjust any defaults for filtering your inputs and temperature sensors.
- Save the interface and re-enable it.
Upon re-enabling the interface the old unit types will be converted to the new plugin types. Temperature units already using the “native addressing” system from the old plugin will work with no further adjustment. If you have temperature sensors that are using the real register number as the unit address then you will have to manually change that to the 8 hex character address which will be in the address field of the new temperature sensor units that XTension will create.
If you don’t already have units in the XTension database for all your inputs and outputs found on your Barix they will be created at this time. If you don’t wish to have units in the database for inputs or outputs that you’re not currently using you can delete these and then uncheck the “create units in XTension” checkbox in the Edit Interface dialog.
Other Verbs Supported
Query
The query verb is supported for this interface. This will ask the Barix for the value of the specified unit and return the value to XTension even if the value has not changed or if the filtering settings are not met. You will always receive a new value after issuing a query command.
In the case of a built in 1-wire temperature sensor the address is translated from the hardware address to the proper current internal register address so you can simply query the unit by name to receive a temperature update right now.
Send Data
The Send Data verb is enabled for this interface. If you need to send raw commands to the Barix you can use this verb. This could be useful for commands not directly supported by XTension such as turning on a relay or output for a specific amount of time without having to have XTension available to send it the opposite command.
The command does not need to be terminated by a return as that will be added by the plugin before sending it to the device.
History
- The original barix plugin has been part of XTension since 2009
- the New plugin using the new plugin architecture was added in XTension v9.4.14 on 12/23/2018
- Support for temp sensors on the X8 expansion modules was added in v9.4.15 on 1/11/2019