Table of Contents
Raspberry Pi GPIO (pigpio)
The pi gpio library is included on every Raspberry Pi and can provide you with monitoring or control of all the GPIO pins. The XTension plugin currently supports input and output as well as PWM and Servo control.
Installation
The plugin is included in the standard XTension distribution as of 9.4.16 so no further install is needed on the XTension side.
The library and server are included in the standard OS images for the Raspberry Pi, but are not enabled by default.
Enable Remote Access
Use either the pi setup app on the desktop or the raspi-config program from the command line and visit the “Interfaces” section. Turn on “remote GPIO access” this does not actually start the server, only writes a configuration option that allows connection to the server from somewhere other than locally on the Pi.
Start the Server on Startup
SSH into the raspberry pi and use the command:
sudo systemctl enable pigpiod
the server will now be started along with the Pi and always be ready for an XTension connection. At this point you can restart or issue a separate command to start the server manually:
sudo pigpiod
the server is now ready for a connection from XTension.
XTension Settings:
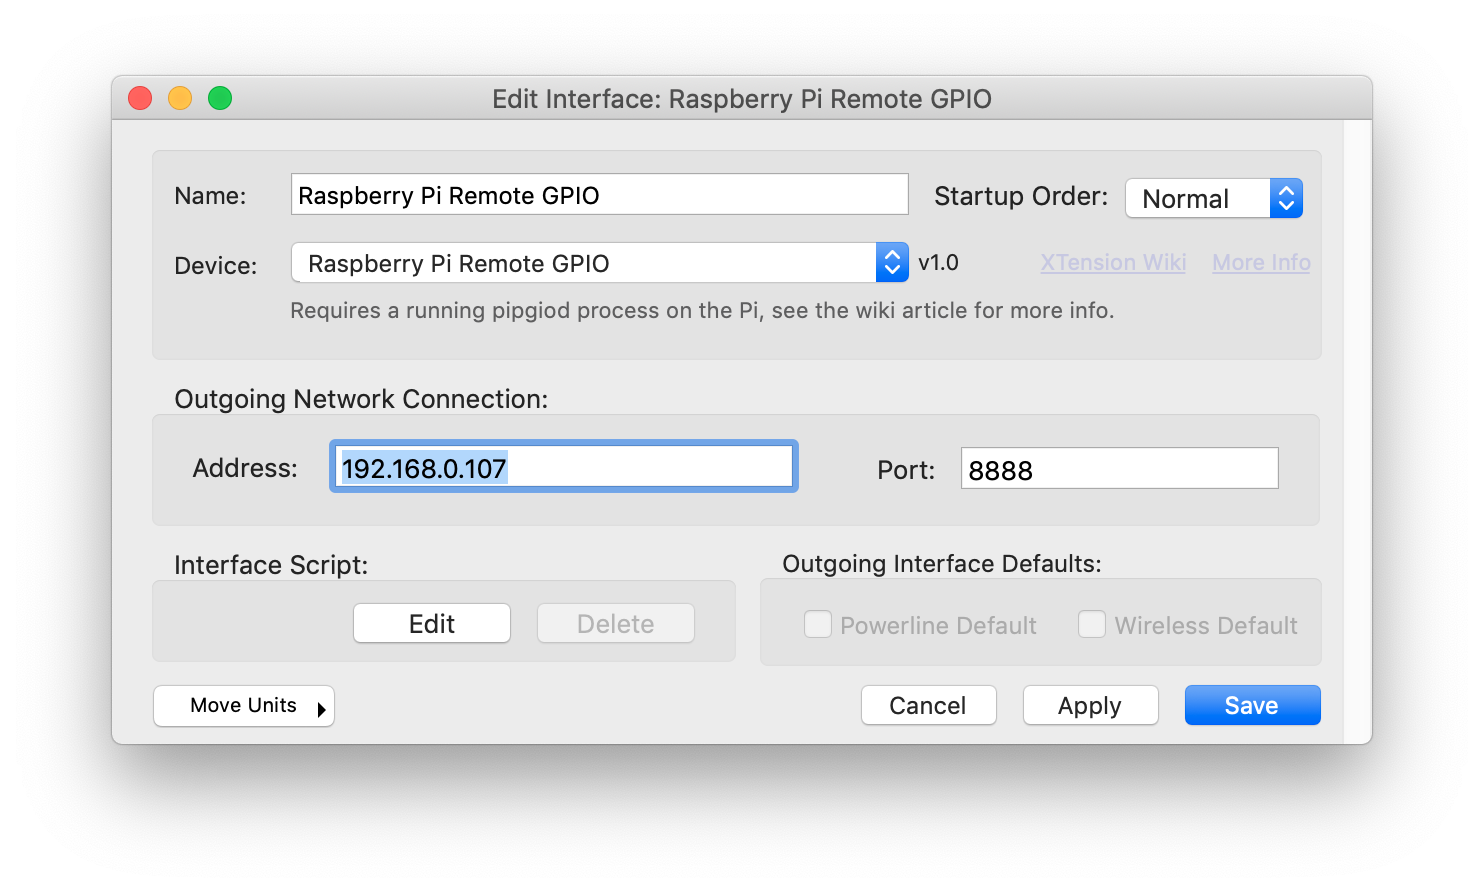 The XTension settings are simple and amount to just the IP address and the Port that the server is running on. If you have set an mDNS name for your Pi you can enter that as the address. If not, or if you just prefer a static IP address you can enter that. A static IP would be preferred.
The port defaults to 8888 and does not need to be changed unless you have altered the configuration on the Raspberry Pi.
Pin Types:
No units are created automatically by this plugin since there are so many pins it would be frustrating to have it create so many potentially unneeded units. Instead create a new Unit on your PIGPIO interface and set the Address of the unit to the pin number that you would like to control. XTension will ignore the pins that you do not have units configured for so they may be used by other processes without interference.
Digital Input:
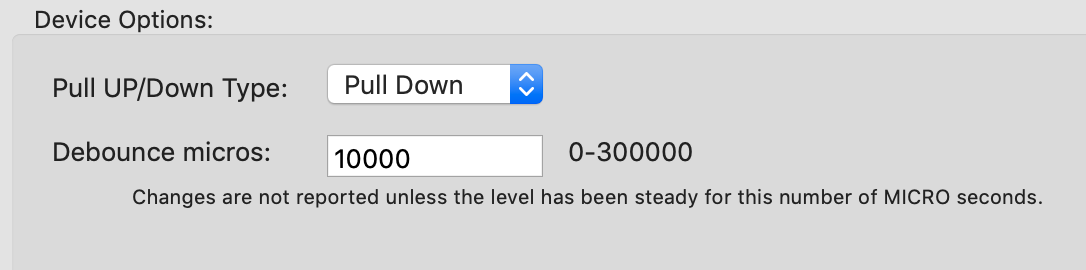 Configuration options for the Digital Input device type. The pin can be made “Pull Up”, “Pull Down” or “Floating”.
Pull Up/Down
A pin set to Pull Up will have a high value resister connected between it and the positive voltage on the Pi. It will hold the value high and you should connect it to Ground to turn the unit On in XTension.
A pin set to Pull Down will have a high value resister connected between it and Ground and you should connect it to the positive voltage from the Pi board to turn the unit in XTension On.
Which of those you use depends on what kind of thing you’re connecting to the pins. For a simple switch or button it doesn’t matter. Other devices might have a high or low output that would need a specific setting.
A pin set to Floating will not have either and you should supply your own externally for whichever makes the most sense. If you fail to provide one or the other the value will randomly and very quickly switch back and forth.
Debounce Micros:
If you’re connecting the pin to a switch or a button you will need to set a debounce period. Any physical switch will have a few milliseconds during the transition where the actual read value will be switching wildly back and forth between on and off before it settles down. This value is the amount of time the reading must be stable in MICROseconds (not milliseconds) before the change will be reported. Without this you’re likely to get dozens or even hundreds of updates back and forth during the first fraction of a second after you press the button. A value of 10,000 is the default and seems good for most devices I’ve used it with. The value must be stable for 10 milliseconds before the change is reported. Value values are from 0 to 300,000.
Digital Output:
Digital output pins have no other options to setup. They will be connected to ground when the Unit in XTension is off and to the positive voltage of the Pi when turned on. (unless you set them to reverse logic in XTension) Please read the documentation on the Pi to learn how much current you can pull from these pins, (it’s not very much at all) before you will burn them out. You can connect a single LED to a pin with the proper resistor, but not one to every pin without some other external hardware to take the load off the Pi itself.
Servo Control:
Servo pins also do not have any extra configuration associated with them. They should be setup as Dimmable/Simulated so that the servo returns to the last on position when you turn the unit on. Use the set value or dim verbs to change the position of a servo connected to this pin.
Valid values for a servo unit are from between 500 to 2500 which will carry the servo from hard one side to hard the other side. Again check the power availability of your Pi before you connect a dozen servo motors to it as you will burn out it’s power supply.
The Servo pin Unit also supports the “rate” parameter of the Turn On and Dim/Brighten verbs so that you can make the servo move more slowly. Yes, it makes little sense to say “dim myServo to 2500” but the set value verb does not include the rate parameter so use the dim or brighten command. The rate is the number of milliseconds between steps. Larger numbers are slower.
PWM
 A pin set to PWM is a good way to dim an LED light, by using a mosfet or transistor you could dim higher power loads than could be controlled directly from the Pi. Make sure you are not pulling too much power through the output pins to keep from burning them out or damaging your Pi.
Like the Servo pin the pwm units support the “rate” parameter so you can do a soft fade from one level to another.
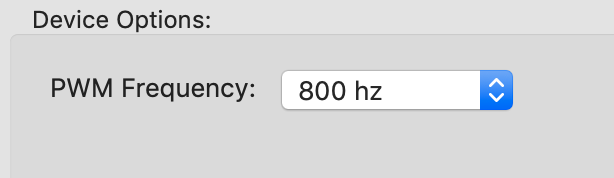
The PWM unit type lets you choose the PWM frequency of the output. Slower rates may produce visible and annoying flicker in any led’s attached, but very high frequencies may cause ballasted lamps to overheat and either burn out or become a fire hazard. In my testing a value of 800hz was more than enough to make the flickering invisible to my eye.
Hardware Serial Port
 The Hardware Serial unit type lets you use the built in UART in the Pi or any supported usb/serial adaptor. This is for use with “real” serial ports. For virtual “software” ports on any other GPIO pin see the Software Serial Port below. You need to know the path to the /dev entry for the serial port. For the built in serial port the value defaults to “/dev/ttyAMA0” Select the appropriate Baud rate from the popup. Not all baud rates may be supported on all hardware so take care to test if using a less standard value.
The data is brought out to a TCP Socket listening on the port you enter in the “Route to Local TCP Port” setting. This connection will accept only a single client at a time and the port number must be unique on the system. You can connect to this with any application that could connect to a TCP Port or any of the XTension plugins with that capability.
As an aide to debugging you can select to have all data that passes through the port written to the XTension log. For binary protocols it may be helpful to use the “Write as hex instead of ascii” option.
The Unit in XTension must have a unique Address even though the Units address is not used. If you create the Unit while the interface is running you may leave the address field empty and it will automatically fill it in with the same path to the serial port. If you are creating units without the interface running you must manually give them a unique address. Just a count of the other Hardware Serial units you’ve created so far would be enough.
IMPORTANT: The built in UART on the Pi is a TTL level serial device. It can ONLY be connected to other devices using a 3.3v serial level. If you connect it directly to a 5v device or to an RS232 device it will burn out the UART on the pi and possibly the entire pi. Use the appropriate level shifter or adaptor to safely connect a non 3.3v device to your Pi!
Software Serial Port
 The Software Serial Unit type lets you use any GPIO pins on the pi as a serial port. You can select any available pin for input or output or select None if you don’t need to either listen or talk to the device you’re working with.
The data is brought out to a TCP Socket listening on the port you enter in the “Route to Local TCP Port” setting. This connection will accept only a single client at a time and the port number must be unique on the system. You can connect to this with any application that could connect to a TCP Port or any of the XTension plugins with that capability.
As an aide to debugging you can select to have all data that passes through the port written to the XTension log. For binary protocols it may be helpful to use the “Write as hex instead of ascii” option.
All Units in XTension must have a unique address for every given device type. The Address for this unit is not used for routing messages but must still be unique among all the other Software Serial Units you may create. If you create the unit while the interface is running you can leave the Address field blank and it will fill it in with the format of (incoming pin number or “None”).(outgoing pin number or “None”) If you are creating units without the interface running you must manually supply a unique address for the unit. Just a count of the number of software serial units you’re creating is enough.
IMPORTANT: The built in UART on the Pi is a TTL level serial device. It can ONLY be connected to other devices using a 3.3v serial level. If you connect it directly to a 5v device or to an RS232 device it will burn out the UART on the pi and possibly the entire pi. Use the appropriate level shifter or adaptor to safely connect a non 3.3v device to your Pi!
More Info
The pigpiod server has many more abilities than just the few pin types that I have supported in this first version. If you need 1-wire support or support for the various i2c or other devices that can be connected through it please let me know and I will move that up my to do list.
History:
- The PI GPIO plugin first appeared in XTension 9.4.16
- Hardware and Software serial passthroughs were added in XTension 9.4.20