This is an old revision of the document!
Table of Contents
Building the WiFi 1-Wire Host Kit:
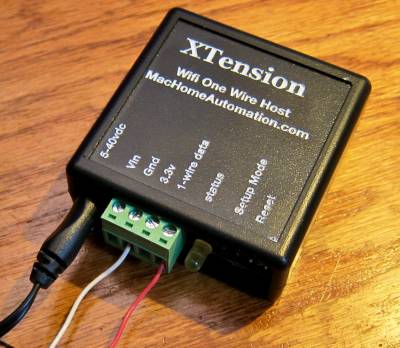 The 1-Wire Host Kit is a through hole soldering kit. For operating and configuration instructions please see this article. The processor is an ESP-01 chip and comes pre-programmed with an Arduino compatible open source firmware that is also digitally signed for security.
Kit Contents:
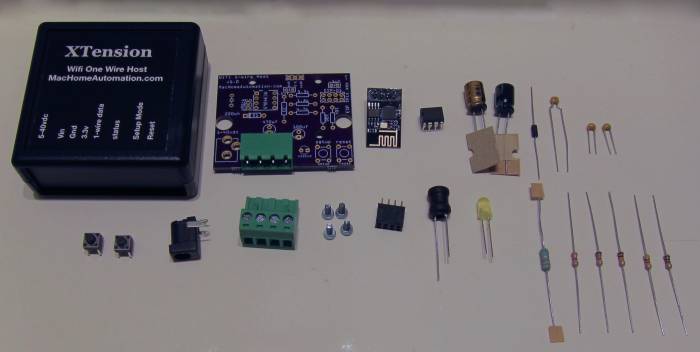 from left to right the kit includes:
Project Enclosure: optionally a black plastic labeled project enclosure or not shown a DIN rail mounting plate.
Circuit Board: Depending on the hardware revision your 4 port header may be pre-soldered to the board when you receive it.
ESP-01: The pre-programmed ESP-01 CPU.
8 pin Switching Power Supply Driver.
470uf Capacitor
100uf Capacitor
Diode depending on the hardware revision you may have a second diode as well.
470pf capacitor
(2) .1uf capacitors
second row:
2 pushbuttons
3.5mm barrel jack for DC power
4 pin removable header
4 2.5m phillips or hex mounting screws
8 pin ESP-01 mounting header
220uH choke
yellow or blue LED
.33ohm power supply sense resistor
5 more 1/4 watt resistors see below for values
Step 1: Solder Resistors
This project is not meant and not setup to be a basic soldering how to. There are MANY such things on the internet. While this is a simple kit to build if you haven’t got some soldering experience you would be well served by doing some other simpler things prior to tackling this kit!
There are 6 resistors included with the kit:

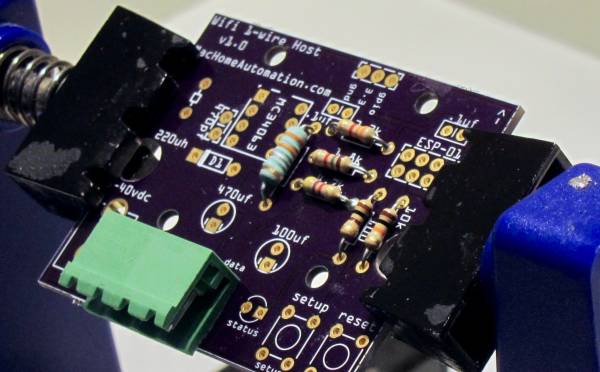 The most obvious is the .33 ohm sense resistor. This is part of the power supply and lets it measure the voltage drop across a small resistor like that in order to keep the voltage the same at the output. This is the larger blue, wire wound resistor. It should be installed just to the right of the 8 pin chip socket. Being a resistor it has no plus or minus so there is no right side up or upside down..
Just to the right of the sense resistor are three more. From top to bottom they are the 3.3k resistor with color bands of “Orange Orange Red Gold” and then below that the 1.8k resistor with color bands of “Brown Grey Red Gold” and lastly in this row the 4.7k resistor with bands of “Yello Purple Red Gold”.
The first 2 are part of the power supply forming a voltage divider to let it sense the voltage being output to the rest of the board. The 4.7k is delivering power to the data line of the 1-wire bus if you’re running in parasitic power mode.
To the right of those 3 are 2 more running vertically. The first is a 100 ohm resistor with color bands of “brown black brown gold” that is a current limiting resistor to the Status LED. The second is a 10 k resistor with color bands of “brown black orange” which is part of the reset circuitry of the ESP chip to make sure that it powers on properly.
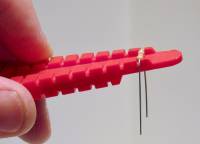 While it is not absolutely necessary it is quite helpful to have a resistor lead former which you can get here: As an aside, the evil mad scientist mentioned in that link and I have been friends since college and I fully endorse his kits and projects and you should build them. Without the motivation of seeing what he was up to I would not have embarked on the adventure that led me to being able to release these kits.
Soldering the Resistors
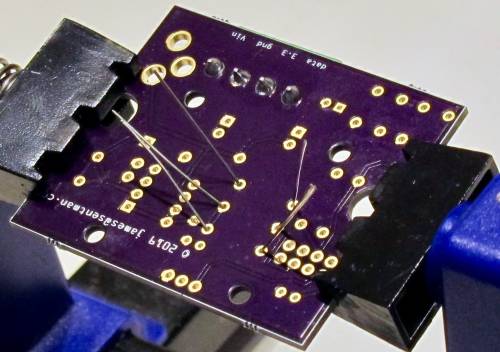 A resistor does not have an orientation that matters so you can insert them in any way. However if you wish to look at this board years in the future and be happy with your work I recommend aligning the gold bands in the same direction left or right and top or bottom.
If you insert the resistor and then bend the leads out to the sides it will hold the resistors in place as you turn the board over and solder them into place.
Again, the pictured holder for a PC board in progress is not required, but it does make the job of placing components and then soldering them in place a bit easier. Resistors are not particularly heat sensitive so take your time and make sure the solder is flowing properly into and around the connections. You should see a nice dome of solder when you’re done. A “ball” that is floating above the connection is not a good connection nor is a matt whitish flow that is sunken into the hole. If you’re seeing any of these then you should take a step back and do some basic soldering exercises or drop me an email with pictures for help.
While these kits will work with leaded or lead free solder I recommend the leaded kind. It is easier for a hobbiest to work with and will last forever even if you didn’t do the best job while soldering it. I assembled my first alpha clock kit with lead free solder and even though I think I did a great job I have had to touch up cold solder joints every couple of years as they just go bad for no reason. If it is legal for you to use leaded solder in your country and you have it then I recommend that you do so. Here are some leaded solder things to remember:
The smoke from the flux has no lead in it. None, not even enough molecules for it to matter. The smoke is an irritant and may make you wish you had thought to put out a fan to blow it away but it will be the same for leaded or lead free solder. The vapor pressure of lead at soldering temperatures is not high enough for it to fly up into the smoke.
The leaded solder will contaminate your hands. If you have touched anything made of lead please wash your hands when you’re done.
lead free solder requires that you work at a higher temperature which makes it more possible to damage the components you’re working on. If you are skilled at soldering then you can almost certainly work with lead free solder at least as well as you can leaded solder. If you’re a beginner leaded solder is much easier.
When you’re done remember not to grind up your old projects and eat them. Seriously recycle them with the proper waste stream as we don’t need any more lead in the landfill improperly. I personally have no intention of recycling any of my projects in my lifetime and will hand them down to my children who will know how to deal with them or properly recycle them so I am not worried about the lead in the system. Both people who purchase this kit will do likewise! If I was selling hundreds of thousands of pre-made devices then I would use the lead free variety. For a small volume kit I think the argument for leaded solder is compelling.
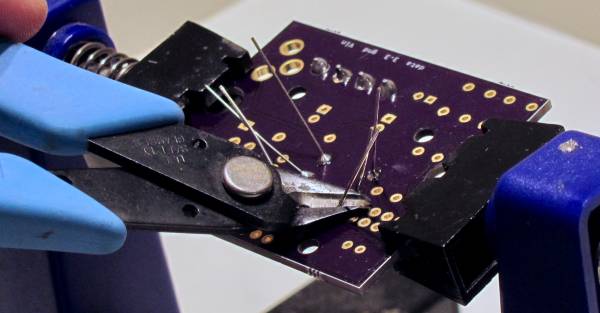 Once you’ve gotten a solder joint that makes you happy get out your flush cutters and cut just above, or just into the solder ball. Do not try to cut flush with the board as you may damage the traces on the board or pull out the solder joint. It’s OK if they stick down a millimeter or so.

